Amazon SES Mastery: Supercharge Email Success with 7 Sensory Steps & Postfix

Setting up an efficient email system is essential in today’s digital landscape. Whether you’re running marketing campaigns, sending transactional updates, confirmations, or simple thank-you messages, leveraging powerful tools like Amazon SES is paramount. In this context, configuring an email system on your shared hosting may seem straightforward, especially for newcomers or those less familiar with the technical aspects. However, to ensure that your emails reach their intended destination and avoid the dreaded spam folder, strategic implementation and the right tools, such as Amazon SES, are crucial.
The Pitfalls of Email Delivery
Setting up a shared hosting and configuring email might initially sound like a straightforward task, but the reality is often more complex. One of the main challenges is avoiding the spam folder, where emails risk being overlooked or disregarded by recipients. To overcome this hurdle, it’s essential to employ a reliable and trusted email service.
Why Amazon SES?
Amazon SES offers a reliable infrastructure, ensuring high deliverability rates for your emails. It provides a cost-effective solution, allowing you to pay only for the emails you send. Additionally, SES includes features like dedicated IP addresses, email analytics, and a straightforward API for seamless integration.
Amazon SES offers a generous free tier for its users, especially for those already on the AWS platform. With Amazon SES, you can send up to 50,000 emails per month (in my case) without incurring any charges. This makes it an ideal choice for small to medium-scale email operations.
However, it’s important to note that once you exceed 50,000 free emails, a nominal fee comes into play. For every additional 1,000 emails beyond the free tier, the cost is approximately $0.10. This pay-as-you-go pricing model ensures that users only pay for the volume of emails they send beyond the generous initial limit.
In summary, Amazon SES provides a cost-effective solution, especially for users with moderate email needs. The free tier allows for substantial usage, and the subsequent pay-per-use pricing ensures that you only pay for the services you consume beyond the initial allocation. This flexibility makes Amazon SES a scalable and budget-friendly choice for businesses of all sizes.
Verify a New Domain
- Access the AWS SES Management Console by logging in.
- Navigate to the Domains section in the left menu, and proceed to verify a new domain by clicking the “Verify Identities” button.
- In the Identity details, choose the identity type, either Domain or Email. For this tutorial, I’ll be selecting the Domain.
- In “verifying your domain”, click on Advanced DKIM settings. Choose EASY DKIM, and then proceed to click on “Create Identity.”
Create SMTP Credentials
To establish authentication between Postfix and Amazon SES, it is necessary to create SMTP credentials.
Remove the domain from the sandbox.
If your account is still in the sandbox, make sure to follow the setup guide. This will allow you to request production access, as the sandbox is limited to 200 emails per 24 hours and only permits email verification instead of domain verification.
Postfix Configuration
The Amazon SES domain has been successfully verified, and we can now proceed with the Postfix configuration.
- Open the postfix configuration file:
sudo nano /etc/postfix/main.cf
- Remove the empty relayhost line and add the following lines at the end of the file:
relayhost = [email-smtp.ap-southeast-1.amazonaws.com]:587smtp_sasl_auth_enable = yessmtp_sasl_security_options = noanonymoussmtp_sasl_password_maps = hash:/etc/postfix/sasl_passwdsmtp_use_tls = yessmtp_tls_security_level = encryptsmtp_tls_note_starttls_offer = yes
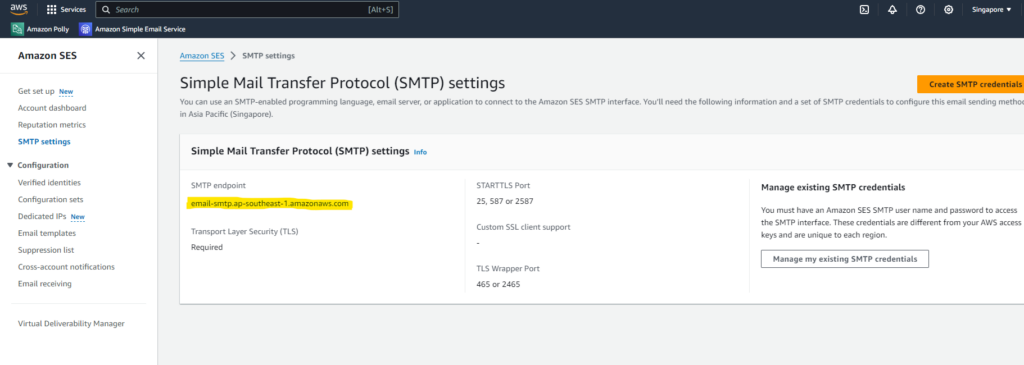
Replace the relayhost based on the AWS region you are using. You can find the Server Name by clicking on SMTP Settings in the left menu.
- Create the authentication file:
sudo nano /etc/postfix/sasl_passwd
- and add the SMTP Credentials in the following format:
[$SMTP_HOST]:587 $SMTP_USERNAME:$SMTP_PASSWORD
- Hash the authentication file:
sudo postmap hash:/etc/postfix/sasl_passwd
- Set the owner and file permissions:
sudo chown root:root /etc/postfix/sasl_passwd /etc/postfix/sasl_passwd.dbsudo chmod 0600 /etc/postfix/sasl_passwd /etc/postfix/sasl_passwd.dbsudo chown -R root:root /etc/postfix/sudo chmod -R 655 /etc/postfix/
- Restart the Postfix service to apply changes:
sudo systemctl restart postfix
Following the configuration of Amazon SES for Postfix, it’s time to conduct testing to ensure the successful delivery of emails via SMTP.


